Probably the most important facts you need from a microphone's data sheet inform you about the dynamic range of that microphone. However very few manufacturers provide users with that essential information, not even the basic data to allow users to work it out for themselves. If you need to calculate the dynamic range for yourself from the specific data, here are some clues as how to do it correctly.
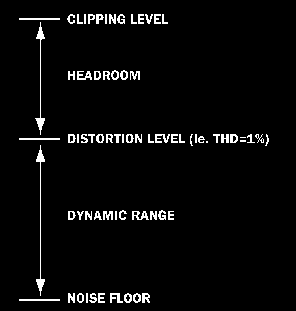
According to the international standard IEC 268, the dynamic range of any kind of professional audio equipment is calculated as the difference between the total noise floor (measured in dB(A)) and the equivalent sound pressure level (measured in dB) where a certain amount of total harmonic distortion appears.
The manufacturer can choose the amount of distortion he wants to specify the SPL at, as long as the THD appears in the printed literature. Normally, microphone manufacturers all over the world specify the equivalent sound pressure level at 0.5% THD, but as distortion normally increases with a certain linearity according to the input level, you will always be able to estimate the SPL at any amount of THD, because the THD is double with a 6dB increase of the input level.
The range from the equivalent SPL to the clipping point of the microphone is called the headroom of the microphone. Normally, microphone manufacturers do not calculate the headroom, but the information regarding the total clipping level of the microphone is of great importance to the user - however you can never be certain that this information will be there in the data sheet.
The real trouble is not that the manufacturer sets the THD himself, or that he does not inform you about the clipping level of the microphone. The confusion is how the microphone manufacturer measures noise floor, equivalent SPL and clipping level. Does the user get the right information in the data sheet?
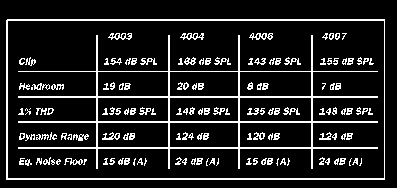
The distortion of the DPA omnidirectional microphones has been measured on a B&K High Pressure Calibrator. This technique is a so-called reference measurement technique, where you use a high-quality measurement microphone as a reference microphone. The calibrator has a very small air enclosure and its transducer can produce extreme sound pressure levels on the microphone capsule. The mechanical design of the microphones you are going to test needs to be able to fit into the calibrator adapter. The illustration below shows the measured data and calculated dynamic range and headroom of the omnidirectional microphones Types 4003/4006 and Types 4004/4007.
The pressure gradient microphone capsule on the 4011 and 4012 are measured with a different technique. This method uses a tuned tube mounted directly on a loudspeaker. Using a half wavelength tube, the sound pressure level directly at the end of the tube can get extremely high. Again this is a reference measurement method with a high quality measurement microphone as reference. If the quality of the loudspeaker is less than the microphone in question, you tune the tube to a quarter of the wavelength. At the end of the tube, there will be a high velocity of the air molecules without the loudspeaker membrane moving very much. Long-term tests will, however, overheat the coil of the loudspeaker.
All the DPA Product Specifications will provide you with measured data regarding noise floor, equivalent sound pressure level at 1% THD and sound pressure level before clipping occurs.
Other microphone manufacturers specify measurement results that could easily be mistaken for these data. They measure the noise floor of the total microphone (i.e. capsule and preamplifier), but the figures for distortion and, if given, the sound press level before clipping occurs are measured without the microphone capsule - the most critical component of the microphone. Only the microphone preamplifier is measured with an equivalent electronic signal.